Button Frame: Difference between revisions
m (Reverted edits by CEREN (talk) to last revision by Christopher) Tag: Rollback |
|||
| Line 12: | Line 12: | ||
In this activity the child learns how to button and unbutton. | In this activity the child learns how to button and unbutton. | ||
== | == Presentation == | ||
# | # Take the button frame to a table or mat. | ||
#:[[Image:Button Frame 1.JPG|280px]] | #:[[Image:Button Frame 1.JPG|280px]] | ||
# | # Pinch the button in the right hand and pull the button-hole open with the left hand. | ||
#:[[Image:Button Frame 2.JPG|280px]] | #:[[Image:Button Frame 2.JPG|280px]] | ||
# | # Guide the button half-way through the button-hole. | ||
#:[[Image:Button Frame 3.JPG|280px]] | #:[[Image:Button Frame 3.JPG|280px]] | ||
# | # Pull back the fabric and take the button out the rest of the way. | ||
#:[[Image:Button Frame 4.JPG|280px]] [[Image:Button Frame 5.JPG|280px]] | #:[[Image:Button Frame 4.JPG|280px]] [[Image:Button Frame 5.JPG|280px]] | ||
# | # Do the same with the rest of the buttons. | ||
# To close the buttons, push half of the button through the button-hole. | |||
#:[[Image:Button Frame 6.JPG|280px]] | #:[[Image:Button Frame 6.JPG|280px]] | ||
# | # Pull the button with the right hand and pull the button-hole open with the left to allow the button to pass through. | ||
#:[[Image:Button Frame 7.JPG|280px]] | #:[[Image:Button Frame 7.JPG|280px]] | ||
Revision as of 16:44, 29 January 2020
| Button Frame | |
|---|---|
| Practical Life - Dressing | |
 | |
| Level | Primary |
| Age | 3 - 5 |
| Prerequisites | Grasping Transfer |
| Materials | Button Frame |
In this activity the child learns how to button and unbutton.
Presentation
- Take the button frame to a table or mat.
- Pinch the button in the right hand and pull the button-hole open with the left hand.
- Guide the button half-way through the button-hole.
- Pull back the fabric and take the button out the rest of the way.
- Do the same with the rest of the buttons.
- To close the buttons, push half of the button through the button-hole.
- Pull the button with the right hand and pull the button-hole open with the left to allow the button to pass through.


Points of Interest
Control of Error
Variations and Extensions
- button frames with large and small buttons are available
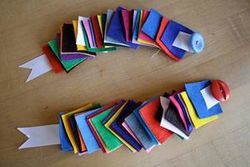
Button Snake
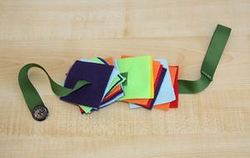
A fun variation on the button frame is a button snake or felt snake. You will need a ribbon with a button sewn at one end, and squares of felt with button holes cut to match the size of the button. The button is pushed through the hole in a felt square, and then you slide the square down the ribbon.
- You can sew a button at one end and glue a felt square near the other end:
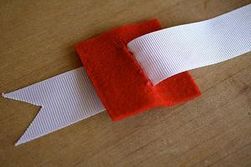
- Source: Jonah Lisa Land
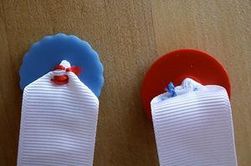
- You can also sew a button on both ends of the ribbon:
- Source: What Did We Do All Day?
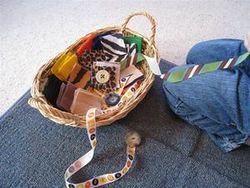
- You can also sew the end of the ribbon in a loop:
- Source: Counting Coconuts
- The felt can be cut into different shapes:
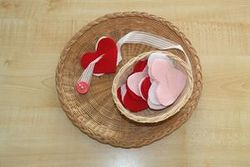
- Source: Counting Coconuts


Material
Make Your Own
Where to Buy
(For sets of dressing frames and stands see Dressing Frames.)
Large Buttons
Absorbent Montessori $12.00
Adena $8.89
Affordable Montessori $15.00 (for toddlers)
Affordable Montessori $12.00
Albanesi $50.00
Alison's $12.00 (for toddlers)
Alison's $13.50
Alison's $25.00
Bruins $35.00
Caliber $8.99
Creative Learning $9.95
E & O $25.00
Early School $28.00
ETC Montessori $35.00
IFIT $11.00
Juliana $44.10
Kid Advance $11.99
Lord Co. $42.50
Materials Co. of Boston $33.00
Mindset $12.73
Mindset $35.47
Montessori Concepts $9.00
Montessori Land $19.00
Montessori Outlet $14.95
Nienhuis $39.40
Thinkamajigs $14.95
Small Buttons
Absorbent Montessori $12.00
Adena $9.16
Affordable Montessori $12.00
Albanesi $50.00
Alison's $13.50
Alison's $15.00
Alison's $25.00
Bruins $35.00
Caliber $8.99
Creative Learning $9.95
E & O $25.00
Early School $28.00
ETC Montessori $35.00
IFIT $11.00
Juliana $44.10
Kid Advance $9.99
Materials Co. of Boston $33.00
Mindset $12.73
Mindset $35.47
Montessori Concepts $9.00
Montessori Land $19.00
Montessori Outlet $14.95
Nienhuis $39.40
Thinkamajigs $14.95
Further Reading
- Basic Montessori: Learning Activities for Under-fives by David Gettman, pages 44-46
- Teaching Montessori in the Home: The Pre-School Years by Elizabeth G. Hainstock, pages 23, 91
- Teach Me to Do It Myself by Maja Pitamic, pages 20-21