Land and Water Form Trays: Difference between revisions
From Montessori Album
(Created page with '{{Infobox Lesson | Name = Land and Water Form Trays | Topic = Social Studies | Subtopic = Geography | image = 320px | Le…') |
No edit summary |
||
| Line 7: | Line 7: | ||
| Age = | | Age = | ||
| Preqs = | | Preqs = | ||
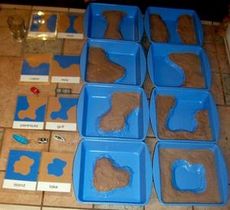
| Materials = | | Materials = Water Form Tray <br> small pitcher of water (could be dyed blue) <br> sponge <br> tray | ||
}} | }} | ||
This material teaches the child about land and water forms. | This material teaches the child about land and water forms. | ||
== Presentation == | == Presentation == | ||
# | # Take the tray to a table or mat. | ||
#: [[Image:Land and Water 1.JPG| | #: [[Image:Land and Water 1.JPG|240px|center]] | ||
# Step two | # Step two | ||
#: [[Image:Land and Water 2.JPG| | #: [[Image:Land and Water 2.JPG|240px|center]] | ||
# Step three | # Step three | ||
<br><br> | |||
Different classrooms handle the removing of the water from the tray in different way. Some have the children pour the water directly back into the pitcher. Some have the children move the water back to the pitcher with a small baster. Some have the children empty the tray into the sink and the refill the pitcher for the next child. Do whatever works best for you. | |||
== Points of Interest == | == Points of Interest == | ||
| Line 25: | Line 26: | ||
== Material == | == Material == | ||
===Make Your Own=== | |||
*These were made with [http://www.dickblick.com/products/amaco-sculptamold/ Sculptamold] and inexpensive brownie pans: | |||
*:[[File:Walk Beside Me landform 1.jpg|230px]] [[File:Walk Beside Me landform 2.jpg|230px]] | |||
*: (For a detailed description of how this was done, see [http://sporschool.blogspot.com/2010/01/land-and-water-forms.html Walk Beside Me] | |||
Revision as of 15:41, 26 February 2012
| Land and Water Form Trays | |
|---|---|
| Social Studies - Geography | |
 | |
| Level | Primary |
| Materials | Water Form Tray small pitcher of water (could be dyed blue) sponge tray |
This material teaches the child about land and water forms.
Presentation
- Take the tray to a table or mat.
- Step two
- Step three


Different classrooms handle the removing of the water from the tray in different way. Some have the children pour the water directly back into the pitcher. Some have the children move the water back to the pitcher with a small baster. Some have the children empty the tray into the sink and the refill the pitcher for the next child. Do whatever works best for you.
Points of Interest
Control of Error
Variations and Extensions
Material
Make Your Own
- These were made with Sculptamold and inexpensive brownie pans:
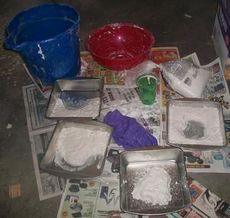
- (For a detailed description of how this was done, see Walk Beside Me

