Weaving Paper: Difference between revisions
From Montessori Album
(Created page with "{{Infobox Lesson | Name = Weaving Paper | Topic = Art | Subtopic = Weaving | image = | Level = Primary | Age = 3 | Preqs...") |
No edit summary |
||
| (4 intermediate revisions by the same user not shown) | |||
| Line 3: | Line 3: | ||
| Topic = Art | | Topic = Art | ||
| Subtopic = Weaving | | Subtopic = Weaving | ||
| image = | | image = [[File:Weaving Paper 8.jpg|360px]] | ||
| Level = [[Primary]] | | Level = [[Primary]] | ||
| Age = 3 | | Age = 3 | ||
| Preqs = [[Cutting Paper]] ('''none''' if the paper is pre-cut) | | Preqs = [[Cutting Paper]] ('''none''' if the paper is pre-cut) | ||
| Materials = paper | | Materials = paper with lines going almost across the page<br>paper with lines that cross the page<br>scissors<br>glue stick | ||
}} | }} | ||
| Line 14: | Line 14: | ||
== Presentation == | == Presentation == | ||
# Pick out one sheet of paper that leaves the strips connected at the top, and one or two sheets of paper that have the line to cut going all the way across. | |||
# Take the material to a table. | # Take the material to a table. | ||
#: | # Cut along the lines on the paper. Be sure to leave one paper connected at the top. | ||
# | #:[[File:Weaving Paper 1.jpg|300px]] [[File:Weaving Paper 2.jpg|300px]] | ||
#: | # Weave a strip of paper by going over and under the stationary paper strips. | ||
# | #:[[File:Weaving Paper 3.jpg|360px]] | ||
#: | # Scoot the strip to the top. | ||
# | #:[[File:Weaving Paper 4.jpg|360px]] | ||
#: | # "Our last strip started off by going ''over''. That means this strip will need to start by going ''under''." | ||
#:[[File:Weaving Paper 5.jpg|360px]] | |||
# Continue weaving the strip as with the first one. Then scoot it to the top. | |||
#:[[File:Weaving Paper 6.jpg|300px]] [[File:Weaving Paper 7.jpg|300px]] | |||
# Continue weaving paper strips until the space is full. | |||
#:[[File:Weaving Paper 8.jpg|300px]] [[File:Weaving Paper 9.jpg|300px]] | |||
# Lift the tabs on the ends and put a dab of glue on the stationary strip underneath.<br/ >Press the tab in place.<br/ >Flip the whole paper over to glue the tabs that start on the other side. | |||
#:[[File:Weaving Paper 10.jpg|360px]] | |||
# All done! Hang up the work to display or take it home. | |||
#:[[File:Weaving Paper 11.jpg|360px]] | |||
# Put away the scissors and glue stick.<br/ >Extra paper strips could be put back on the shelf for another student to use. | |||
== Points of Interest == | == Points of Interest == | ||
| Line 33: | Line 43: | ||
*Narrower strips can make the work more challenging | *Narrower strips can make the work more challenging | ||
*A mix of strip widths can be used | *A mix of strip widths can be used | ||
*Different weaving patterns cloud be done (e.g. under 2, over 1) | |||
== Material == | == Material == | ||
===Make Your Own=== | ===Make Your Own=== | ||
Here is the pdf of the material seen above. It also includes pages with narrower strips for older children: | |||
<gallery mode="nolines"> | <gallery mode="nolines"> | ||
File:Paper Weaving icon.jpg|link=File:Paper Weaving.pdf|[[Media:Paper Weaving.pdf| Paper Weaving Printables]] | File:Paper Weaving icon.jpg|link=File:Paper Weaving.pdf|[[Media:Paper Weaving.pdf| Paper Weaving Printables]] | ||
| Line 50: | Line 62: | ||
{{#widget:Affiliate | {{#widget:Affiliate | ||
|link=ServiceVersion=20070822&OneJS=1&Operation=GetAdHtml&MarketPlace=US&source=ac&ref=tf_til&ad_type=product_link&tracking_id=montessoria03-20&marketplace=amazon®ion=US&placement=B083Q8Y213&asins=B083Q8Y213&linkId=b832bd798e056e9186086a89884664f8&show_border=false&link_opens_in_new_window=true&price_color=333333&title_color=0066c0&bg_color=ffffff}} | |link=ServiceVersion=20070822&OneJS=1&Operation=GetAdHtml&MarketPlace=US&source=ac&ref=tf_til&ad_type=product_link&tracking_id=montessoria03-20&marketplace=amazon®ion=US&placement=B083Q8Y213&asins=B083Q8Y213&linkId=b832bd798e056e9186086a89884664f8&show_border=false&link_opens_in_new_window=true&price_color=333333&title_color=0066c0&bg_color=ffffff}} | ||
==Further Reading== | |||
*''[[The Montessori Method]]'' by Maria Montessori, pages 260-261 | |||
*''[[The Kindergarten Guide, Volume 2: The Occupations]]'' by Maria Kraus-Boelté & John Kraus, pages 203-240 | |||
{{#seo: | {{#seo: | ||
|title=Weaving Paper | |title=Weaving Paper | ||
|title_mode=replace | |title_mode=replace | ||
|keywords=Weaving Paper lesson,Art | |keywords=Weaving Paper lesson,Art,Montessori Album,free,printables | ||
|description=Weaves strips of paper under and over other strips of paper. | |description=Weaves strips of paper under and over other strips of paper. | ||
|published_time={{REVISIONYEAR}}-{{REVISIONMONTH}}-{{REVISIONDAY2}} | |published_time={{REVISIONYEAR}}-{{REVISIONMONTH}}-{{REVISIONDAY2}} | ||
}} | }} | ||
Latest revision as of 16:35, 4 October 2020
| Weaving Paper | |
|---|---|
| Art - Weaving | |
 | |
| Level | Primary |
| Age | 3 |
| Prerequisites | Cutting Paper (none if the paper is pre-cut) |
| Materials | paper with lines going almost across the page paper with lines that cross the page scissors glue stick |
In this activity the child weaves strips of paper under and over other fixed paper strips.
Paper weaving is good preparation for other weaving and sewing activities.
Presentation
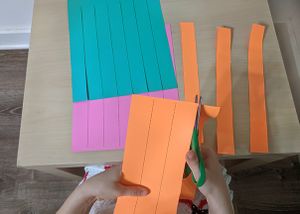
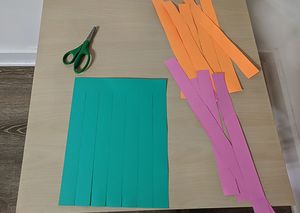
- Pick out one sheet of paper that leaves the strips connected at the top, and one or two sheets of paper that have the line to cut going all the way across.
- Take the material to a table.
- Cut along the lines on the paper. Be sure to leave one paper connected at the top.
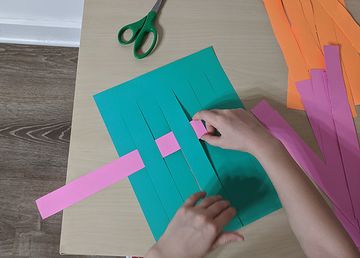
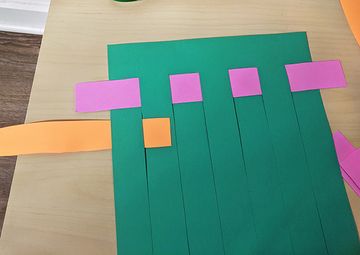
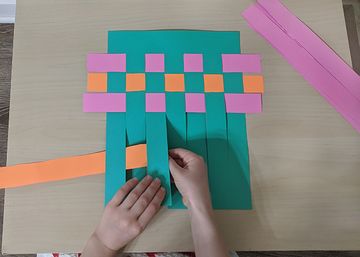
- Weave a strip of paper by going over and under the stationary paper strips.
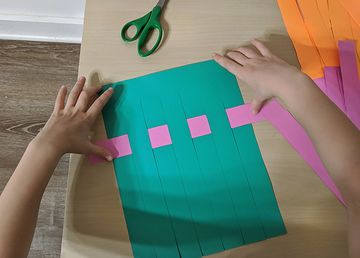
- Scoot the strip to the top.
- "Our last strip started off by going over. That means this strip will need to start by going under."
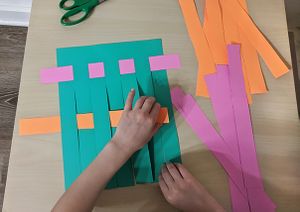
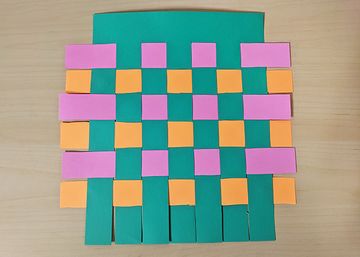
- Continue weaving the strip as with the first one. Then scoot it to the top.
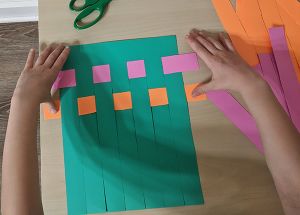
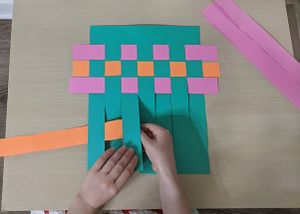
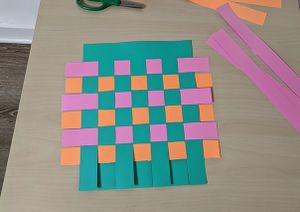
- Continue weaving paper strips until the space is full.
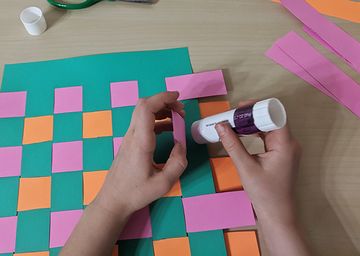
- Lift the tabs on the ends and put a dab of glue on the stationary strip underneath.
Press the tab in place.
Flip the whole paper over to glue the tabs that start on the other side. - All done! Hang up the work to display or take it home.
- Put away the scissors and glue stick.
Extra paper strips could be put back on the shelf for another student to use.
Points of Interest
- The patterns made by going under and over the paper
Control of Error
- The pattern will look wrong if a mistake was made
Variations and Extensions
- Children could cut the paper into strips themselves
- Narrower strips can make the work more challenging
- A mix of strip widths can be used
- Different weaving patterns cloud be done (e.g. under 2, over 1)
Material
Make Your Own
Here is the pdf of the material seen above. It also includes pages with narrower strips for older children:
Where to Buy
Further Reading
- The Montessori Method by Maria Montessori, pages 260-261
- The Kindergarten Guide, Volume 2: The Occupations by Maria Kraus-Boelté & John Kraus, pages 203-240
